
In this article we will cover off Azure VM Scale Sets (VMSS) and how we can leverage them to automatically deploy/scale our web applications.
To make this more usable to deploy our custom applications, we will leverage Azure Storage accounts that host our application files in a protected manner. Whilst the scripts used in this article are very simple, they can be extended to host your applications with secret information that is encrypted end to end between your storage account and the Azure VM’s. In the end, the application will also be updated to simulate an automatic update of our deployment.
This article will leverage Azure CLI 2.0. A primer is available from a previous post here.
We will first setup our resource group that will host the deployment and storage blobs that will host our application files. Let’s create them with the following parameters:
- Resource Group Name: rg-austeast-vmss
- Storage Account Name: savmss
The CLI is as follows:
az group create --name rg-austeast-vmss --location australiaeast
az storage account create -n savmss -g rg-austeast-vmss -l australiaeast --sku Standard_LRS
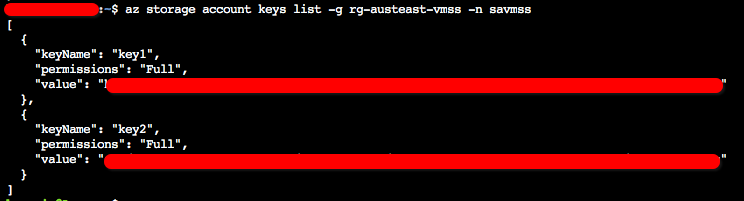
Next we need the key for our storage account. The key is needed to (1) upload our application files to and (2) define them in our VMSS configuration later on:
az storage account keys list -g rg-austeast-vmss -n savmss
The output will provide a primary and secondary key as follows (we will use the primary key):
We would either specify the key in the upcoming commands or set AZURE_STORAGE_ACCOUNT and AZURE_STORAGE_ACCESS_KEY environment variables:
export AZURE_STORAGE_ACCOUNT=”savmss”
export AZURE_STORAGE_ACCESS_KEY=”StorageAccountKey”
We now need to create a blob container to host the application files (shell scripts in our case). We will call the container “app-container”:
az storage container create --name app-container--account-name savmss --account-key $SA-KEY
We are going to deploy 2 versions of the application to our scale sets. The first version will be using a shell script named v1.sh and the second version will be named v2.sh. v2.sh will be executed later on to simulate an automated update of the scale set. Let’s create v1.sh that will simply install Apache/PHP and create a html index file that will load displaying it is v1. Save the following file as a text file within the shell:
[v1.sh]
#!/bin/sh
sudo yum -y install httpd php
sudo systemctl enable httpd
sudo systemctl start httpd.service
sudo echo "<html><body>Hello - v1</body></html>" > /var/www/html/index.html
Now remember that v1.sh can be any script you determine necessary to bootstrap the VM’s to be deployed and customise so we can instantiate the web application. With v.1sh in place let’s upload it to the blob:
az storage blob upload --container-name app-container --file v1.sh --name v1.sh --account-name savmss --account-key $SA-KEY
Now let’s create a URI now to access the blob:
az storage blob url –container-name app-container –name v1.sh –protocol https –account-name savmss –account-key $SA-KEY
The following is a sample output (I am using environmental variable for the key):
![]()
The URI above “https://savmss.blob.core.windows.net/app-container/v1.sh” will be used as part of our definition for the scale set in the next section.
VM Scale Sets
Now that we have our application files (in my this case just a simple shell script to install Apache and load up a sample HTML file), we will deploy a VM Scale Set (VMSS) based on a Centos image that will use the above script when each VM is being instantiated.
Next, we need to create our schema configuration files for the scale sets. There are two configurations sets we need to apply, Public Configuration and Protected Configuration. The Public configuration will include the URI to our shell script blob URL and the Protected configuration will include the secret information such as storage account and key. The configuration will be defined using JSON configuration files:
[app-v1-public.json]
{
  "fileUris": ["https://savmss.blob.core.windows.net/app-container/v1.sh"]
}
[app-v1-protected.json]
{
  "commandToExecute": "./v1.sh",
  "storageAccountName": "savmss",
  "storageAccountKey": "$SA-KEY"
}
The JSON file defines the following (all are case sensitive):
- fileURIs: the URL to download the script to deploy the application on the server
- commandToExecute: The script to execute
- storageAccountName: The name of our Azure Storage Account
- storageAccountKey: The key to access our Storage Account (which I am using with the reference $SA-KEY)
Now, we will create the VM Scale Set using “az vmss create” CLI command:
az vmss create --resource-group rg-austeast-vmss --name vmss1 --instance-count 2 --image Centos --upgrade-policy-mode automatic --admin-username azureuser --generate-ssh-keys
Let’s have a look at the options for the command that were set:
- Resource Group Name: This is the name of the resource group we created above
- Name: The name of the VM Scale Set
- Instance Count: We are starting off with two. We can use further JSON notation to define “minimum” and “maximum” values for our scale sets
- Upgrade Policy: We set this to automatic here. Other options are “Rolling” to do them in batches or “Manual” if you were using customised OS images
- Admin Username: This is the username to access the VM’s in the scale set
- Generate SSH Keys: Here we are specifying to auto-generate the keys. We could use our own keys also, we will keep it simple for now to access the VM using the local shell
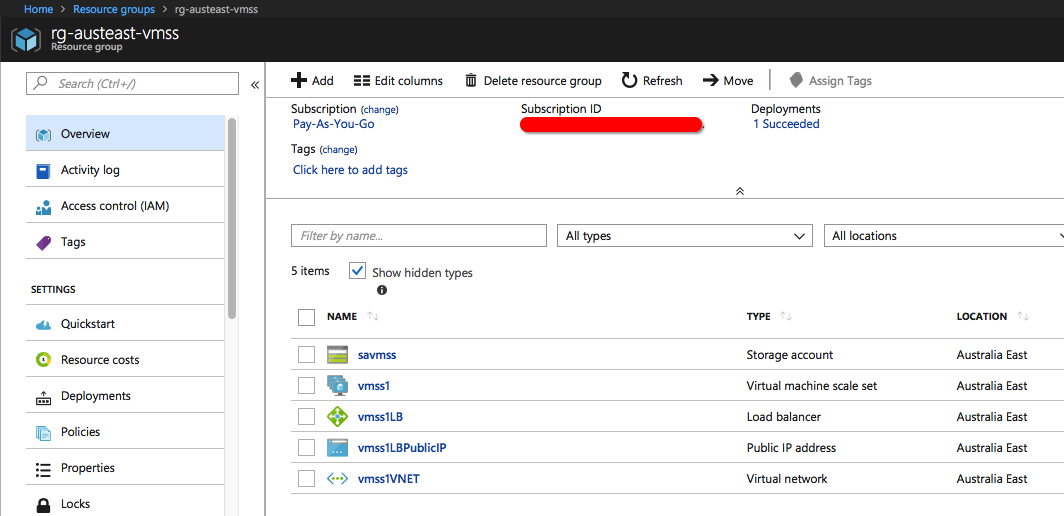
On successful completion of the command, we should now see the VM Scale Set along with the VM’s, VNET, Public IP and Load Balancer that are also created along with it. The Public IP is what we will use to access the web application. Azure Portal would look something like this:
And the Public IP:

If we tried to access the URL at https://13.70.110.122 we would get no result as we have not yet customised the scale set with our definition above and no load balancing rules specified. Thats the next part.
Let’s customise the scale set with our schema configuration defined earlier:
az vmss extension set --publisher Microsoft.Azure.Extensions --name customScript --resource-group rg-austeast-vmss --vmss-name vmss1 --settings @app-v1-public.json --protected-settings @app-v1-protected.json
Now that the scale set has been updated with our application, we need to access and test it out. When we deployed the scale set, a load balancer was created for us. We will create a rule to forward port HTTP (TCP 80) to the scale set to be Abel to access our application:
az network lb rule create \
  --resource-group rg-austeast-vmss \
  --name myLoadBalancerRuleWeb \
  --lb-name vmss1LB \
  --backend-pool-name vmss1LBBEPool \
  --backend-port 80 \
  --frontend-ip-name loadBalancerFrontEnd \
  --frontend-port 80 \
  --protocol tcp
Note, you can also use the command “az network lb show -n vmss1LB” and get the Front End and Back End pool names used above.
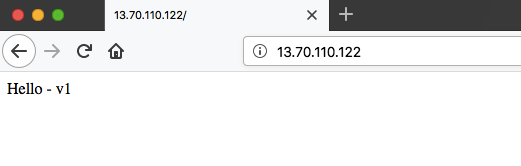
Using the Public IP address noted earlier, we can now access the front end of the web application by going to http://13.70.110.122.You should now see the application up and running (we used the term v1 as the marker):
What the above means is that we have successfully deployed our scale set using our custom configuration script. Now, we want to update the scale set with a new configuration simulating a new version of the application. Let’s create a new shell script (a new version of the application) using a new script we will call v2.sh:
[v2.sh]
#!/bin/sh
sudo yum -y install httpd php
sudo systemctl enable httpd
sudo systemctl start httpd.service
sudo echo "<html><body>Hello - v2</body></html>" > /var/www/html/index.html
Update our blob container with v2.sh:
az storage blob upload --container-name app-container --file v2.sh --name v2.sh --account-name savmss --account-key $SA-KEY
az storage blob url --container-name app-container --name v2.sh --protocol https --account-name savmss --account-key $SA-KEY

Next, we need to create a set of new Public and Protected schema configuration files with the new version – v2.sh:
[app-v2-protected.json]
{
  "commandToExecute": "./v2.sh",
  "storageAccountName": "savmss",
  "storageAccountKey": "$SA-KEY"
}

[app-v2-public.json]
{
  "fileUris": ["https://savmss.blob.core.windows.net/app-container/v2.sh"]
}
With our updated script in place within our storage account, updated schema configuration files, we can now redeploy our web application and update the VM scale set. We will run the vmss command to customise our scale set:
az vmss extension set --publisher Microsoft.Azure.Extensions --name customScript --resource-group rg-austeast-vmss --vmss-name vmss1 --settings @app-v2-public.json --protected-settings @app-v2-protected.json
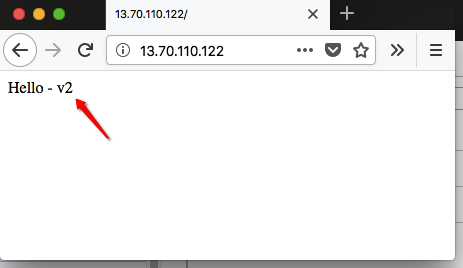
In a few moments, our VM’s within the scale set will be re-deployed with our updated application/script. Browse to the http://13.70.110.122 URL in the browser and we will now see that the changes have taken affect:
You can see what features this approach provides us to auto-deploy applications using VM Scale Sets within Azure. Th shell scripts we use will enable us to automate the installation, configuration and bootstrapping of any application we need. Using Protected settings allows us to define secret information that can be used to enable the custom deployment as needed.
Another handy tip is that the LB will create by default a NAT to each VM in the scale set. We can use these NAT’s to connect to our VM’s to perform any checks/maintenance tasks (in our case it NAT’d ports 50000 and 50003):
ssh -p 50000 azureuser@13.70.110.122
ssh -p 50003 azureuser@13.70.110.122
Now let’s clean up the scale set/resource group:
az group delete --name rg-austeast-vmss --no-wait --yes