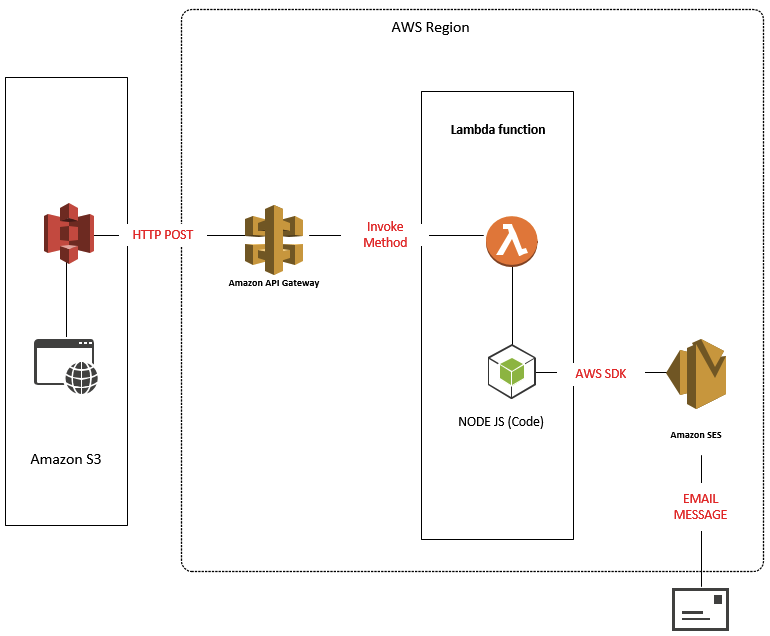
In this post we will demonstrate how we can create a simple Contact form on Amazon S3 by deploying an Amazon Serverless Function using AWS Lambda fronted by Amazon API Gateway that will use Amazon SES (Simple Email Service). Furthermore, it will all be done through the CLI.
Let’s describe each service, what it offers and how it will fit in to our deployment:
- Amazon S3 – S3 is an object storage service that will store files accessible from anywhere. We will use this service to for our publicly accessible S3 bucket which will host the web page to submit our form
- Amazon API Gateway – allows us to create, publish, maintain, monitor, and secure APIs at scale. We will create an API gateway which the web page hosted in our S3 bucket will use to make a HTTP POST request.
- Amazon Lambda – a secured serverless computing service hosted by Amazon that allows us to create (mostly stateless) code and run at scale.API Gateway will invoke our Lambda function written in NodeJS
- Amazon SES – a cost-effective, secured and reliable email service hosted by Amazon. Our Lambda function will send our email from the contact form using Amazon SDK and deliver the message to our hosted email provider
The following diagram illustrates our topology.
The deployment will be using AWS CLI. For further details, we have covered this in a previous post found here.
Firstly, we need to an Amazon IAM role that will embed the required permissions to allow:
- Our Lambda function to Execute the code and create log entries in our Amazon CloudWatch Logs
- Our Lambda function to send an email using Amazon SES
- API Gateway to Invoke the Lambda method
The process is to create the role and then add the policies for each of the above. We use JSON format to specify each policy and attach them to the role. The following files you will need to create first:
{
  "Version": "2012-10-17",
  "Statement": {
    "Effect": "Allow",
    "Principal": {"Service": "lambda.amazonaws.com"},
    "Action": "sts:AssumeRole"
  }
}

[permissionspolicyforlambda.json]

{
    "Version": "2012-10-17",
    "Statement": [
        {
            "Effect": "Allow",
            "Action": [
                "logs:CreateLogGroup",
                "logs:CreateLogStream",
                "logs:PutLogEvents"
            ],
            "Resource": "*"
        }
    ]
}

[permissionspolicyforses.json]

{
    "Version": "2012-10-17",
    "Statement": [
        {
            "Effect": "Allow",
            "Action": [
                "ses:SendEmail"
            ],
            "Resource": [
                "*"
            ]
        }
    ]
}

[permissionspolicyforapigw.json]

{
	"Version": "2012-10-17",
	"Statement": [
	    {
	        "Effect": "Allow",
	        "Action": "lambda:InvokeFunction",
	        "Resource": "*"
	    }
	]
}
Now we run the following commands to create the roles and attach the policies (inline):
$ aws iam create-role --role-name Test-Role-for-Lambda --assume-role-policy-document file://trustpolicyforlambda.json
$ aws iam put-role-policy --role-name Test-Role-for-Lambda --policy-name Permissions-Policy-For-Lambda --policy-document file://permissionspolicyforlambda.json
$ aws iam put-role-policy --role-name Test-Role-for-Lambda --policy-name Permissions-Policy-For-SES --policy-document file://permissionspolicyforses.json
$ aws iam put-role-policy --role-name Test-Role-for-Lambda --policy-name Permissions-Policy-For-APIGW --policy-document file://permissionspolicyforapigw.json
You will get an ARN for the role (which we will need later on). It should look something like this:

We will make constant references to variables using $VARIABLE-NAME notation. This is to hide specific values and allow you to use a scripting process to update these variables yourself.
The process will start backwards from creating the SES components all the way to creating the S3 components. Let’s start with Amazon SES.
Amazon SES
Amazon SES is a very useful Amazon service that will allow us to send email. In our typical forms we would need to use something like sendmail or postfix to deliver email. This means having a server somewhere to do this and could have its associated hosting/maintenance/security considerations that needs to be taken into account. However with SES we don’t need to worry about all this and use SES on a pay per use basis.
Amazon SES works by us first validating an email address. Once a validation is submitted, an email message is sent form Amazon to verify the address is owned by you. This is a really simple process via CLI by using the “aws ses verify” command:
aws ses verify-email-identity --email-address user@example.com
I have already done this for the email address info@unicloud.com.au. We will move on now to our Lambda function.
AWS Lambda
Now, for the Amazon Lambda function. This is in the form of a NodeJS script. The concept of this post is not to teach the code but rather to demonstrate the process.
Before we start, we need to cover off a couple of important points:
- We need the IAM ARN from above. We will reference it by the variable $IAM-ARN
- The region that will be specified is us-east-1. The reason for this is because Amazon SES is currently only available in certain region hence we have chosen this for this deployment
The following script will parse the JSON data sent via our API Gateway that will be sent through the HTTP post form, extract the message parameters (to address, message body, subject and from address). The script will use the Amazon SDK SES class to take our parameters and send the email through Amazon SES.
[index.js]
'use strict';
// Load the AWS SDK for Node.js
var AWS = require('aws-sdk');

// Set the region. SES is only available in certain regions. We will set our config to use 'us-east-1'
AWS.config.update({region: 'us-east-1'});

// Set the SES EMail address which has been verified
const verifiedEmailAddress = "you@yourvalidatedaddress";

console.log('Recieved new request');

exports.handler = (evt, context, callback) => {

    var emailMsg = JSON.parse(evt.body);

    console.log('Parsing message parameters...')

	// Create sendEmail params
	var params = {
	  Destination: {
	    ToAddresses: [ verifiedEmailAddress ]
	  },
	  Message: {
	    Body: {
	      Text: {
	       Charset: "UTF-8",
	       Data: emailMsg.message
	      }
	     },
	     Subject: {
	      Charset: 'UTF-8',
	      Data: emailMsg.subject
	     }
	    },
	  Source: verifiedEmailAddress,
	  ReplyToAddresses: [  emailMsg.email ]
	};

	// Create the promise and SES service object
	var sendPromise = new AWS.SES({apiVersion: '2010-12-01'}).sendEmail(params).promise();

	console.log('Sending email message...')

	// Handle promise's fulfilled/rejected states
	sendPromise.then(
	  function(data) {
	    console.log(data.MessageId);
	    callback(null, { "statusCode": 200 } );
	  }).catch(
	    function(err) {
	    console.error(err, err.stack);
	    callback(null, { "statusCode": 500 } );
	  });
	  console.log('Completed request.')
};
We will create the function using the CLI. To do this, we need to first zip our JS script above:
$ zip -r LambdaContactFormTest.zip index.js
Create the Lambda function using “aws lambda create-function“:
$ aws lambda create-function \
--region us-east-1 \
--function-name LambdaContactFormTest \
--zip-file fileb://LambdaContactFormTest.zip \
--role $IAM-ARN \
--handler index.handler \
--runtime nodejs6.10
Once we run the above command, we will get the output in a JSON response. It is important to note the function ARN which we will label as $FUNCTION-ARN.
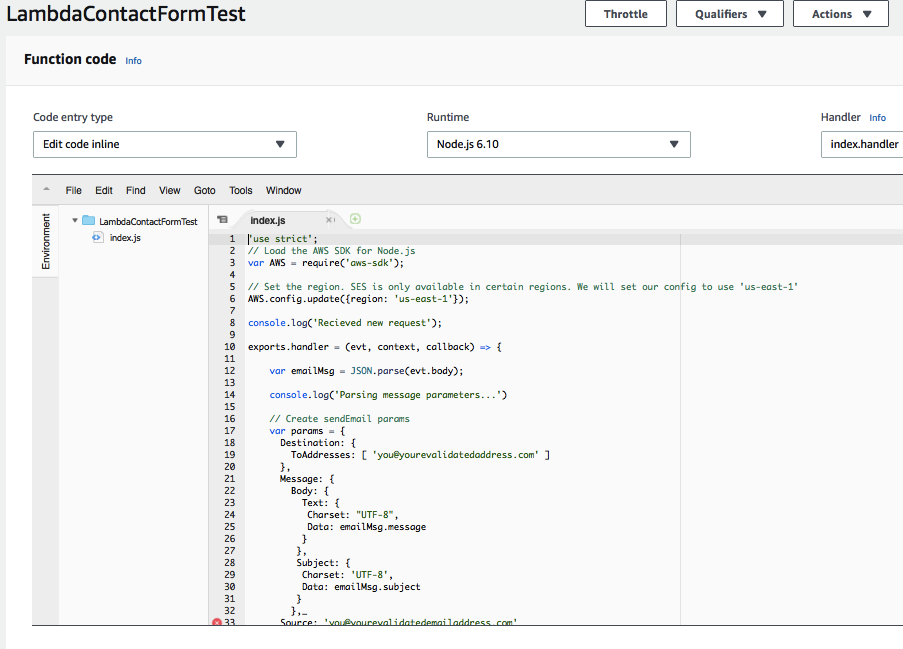
If you wish to verify the execution ran correctly, we can check this in the AWS Console. The below is a screenshot of how our Lambda function should look like (remember to select the correct region from above):

We have highlighted above the resources our function has access to. We will deal with the trigger using API Gateway in the next section. We can go further down and have a look at our code:
Next we will deal with our API Gateway.
API Gateway
The API Gateway is what we will use to trigger our Lambda function. Firstly, we will create an API named LambdaTestAPI configured for HTTP POST. We will associate the POST method with the Lambda function.
$aws apigateway create-rest-api --name "LambdaTestAPI" --region us-east-1
{
    "apiKeySource": "HEADER",
    "name": "LambdaTestAPI",
    "endpointConfiguration": {
        "types": [
            "EDGE"
        ]
    },
    "id": "api-id"
}
The output would generate the above output providing you with the “ID” which we will reference as the $API-ID from here onwards. Next, we need the API Root Resource ID using “aws apigateway get-resources” command:
$ aws apigateway get-resources --rest-api-id $API-ID --region us-east-1
{
    "items": [
        {
            "path": "/",
            "id": "root-resource-id"
        }
    ]
}
The above resource-id we will reference as $ROOT-RESOURCE-ID. Next, we will add the resource:
$ aws apigateway create-resource --rest-api-id $API-ID --parent-id $ROOT-RESOURCE-ID --path-part LambdaTestAPI --region us-east-1
{
    "path": "/LambdaTestAPI",
    "pathPart": "LambdaTestAPI",
    "id": "resource-id",
    "parentId": "root-resource-id"
}
Take note of the “ID” above as we will now define it as the $RESOURCE-ID. Next, we create a POST method on the resource:
$ aws apigateway put-method --rest-api-id $API-ID --resource-id $RESOURCE-ID --http-method POST --authorization-type NONE --region us-east-1
{
    "apiKeyRequired": false,
    "httpMethod": "POST",
    "authorizationType": "NONE"
}
With the above, we have created a HTTP POST method for our API that will be unauthenticated so public access is allowed. We could lock this down with an API key if we so desired but that is outside the scope of this article.
Now it is time to bind the API Gateway to the Lambda Function. We do this by running the
$ aws apigateway put-integration \
> --region us-east-1 \
> --rest-api-id $API-ID \
> --resource-id $RESOURCE-ID \
> --http-method POST \
> --type AWS \
> --request-templates '{"application/json":"{\"body\": $input.json(\"$\")}"}' \
> --integration-http-method POST \
> --uri arn:aws:apigateway:us-east-1:lambda:path/2015-03-31/functions/$FUNCTION-ARN/invocations
{
    "passthroughBehavior": "WHEN_NO_MATCH",
    "timeoutInMillis": 29000,
    "uri": "arn:aws:apigateway:us-east-1:lambda:path/2015-03-31/functions/$FUNCTION-ARN/invocations",
    "httpMethod": "POST",
    "cacheNamespace": "HIDDEN",
    "type": "AWS",
    "cacheKeyParameters": []
}
A few important points to make on the above:
- We needed to specify the region in both the CLI parameter and the URI
- –http-method is the API Gateway method
- –integration-http-method is the method that API Gateway uses to communicate with AWS Lambda
- –uri is unique identifier for the endpoint to which Amazon API Gateway can send the request. Take careful note of the position of $FUNCTION-ARN
Next we set the POST method response and integration returned from the Lambda function:
$ aws apigateway put-method-response --region us-east-1 --rest-api-id $API-ID --resource-id $RESOURCE-ID --http-method POST --status-code 200 --response-models "{\"application/json\": \"Empty\"}"
{
    "responseModels": {
        "application/json": "Empty"
    },
    "statusCode": "200"
}

$ aws apigateway put-integration-response --region us-east-1 --rest-api-id $API-ID --resource-id $RESOURCE-ID --http-method POST --status-code 200 --response-templates "{\"application/json\": \"\"}"
{
    "statusCode": "200",
    "responseTemplates": {
        "application/json": null
    }
}
Now we are ready to create the deployment and push it to our stage called “prod”.
$ aws apigateway create-deployment --region us-east-1 --rest-api-id $API-ID --stage-name prod
{
    "id": "deployment-id",
    "createdDate": 1523972861
}
The above will create the deployment for us to consume. Now we need to add the required permission for API Gateway to Invoke the method for both stage Test (allow us to test through the AWS Console GUI) and Prod (using our form). We will need our API ARN, we can find this by the following:
- $API-ARN = arn:aws:execute-api:region:aws-acct-id:api-id
$ aws lambda add-permission --region us-east-1 --function-name LambdaContactFormTest --statement-id apigateway-test-3 --action lambda:InvokeFunction --principal apigateway.amazonaws.com --source-arn "arn:aws:execute-api:us-east-1:$ACCT-ID:$API-ID/*/POST/LambdaTestAPI"

$ aws lambda add-permission --region us-east-1 --function-name LambdaContactFormTest --statement-id apigateway-prod-3 --action lambda:InvokeFunction --principal apigateway.amazonaws.com --source-arn "arn:aws:execute-api:us-east-1:$ACCT-ID:$API-ID/*/POST/LambdaTestAPI"
We have now finished creating the core components for the API Gateway to send the request to our Lambda function. AWS Console has a very handy tool to visualise the deployment. The below screenshot shows what it looks like when we put it together:
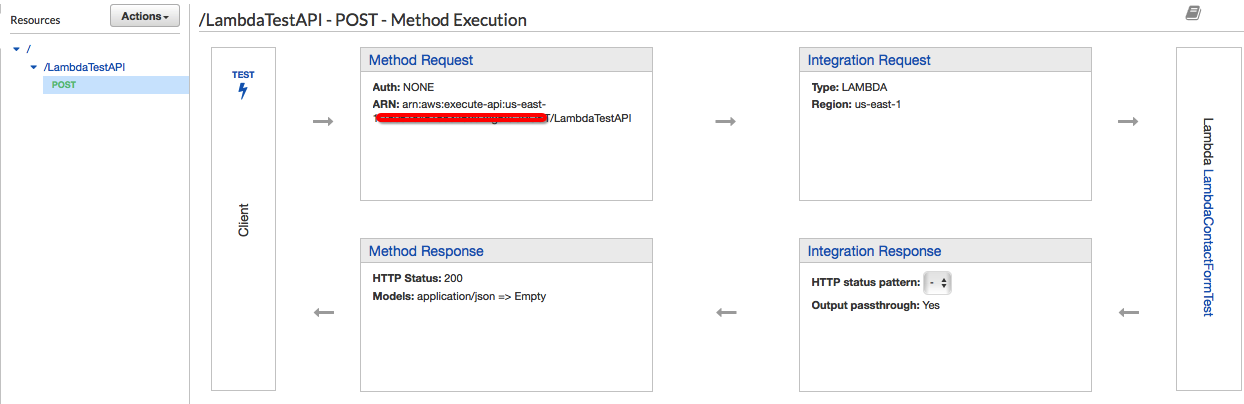
You can see for the POST method execution outlining the integration requests with the Lambda Function. We will now be able to create our form and specify the POST action to point to our API gateway:
- https://$API-ID.execute-api.us-east-1.amazonaws.com/prod/LambdaTestAPI
Now its time to create the form and test using Amazon S3!
Amazon S3
Amazon S3 allows us to host large amounts of data as well as a really cool feature which we will use which is hosting static HTML pages or a website. We will create a simple HTML file called index.html, upload it to an S3 bucket which will submit our form to the API Gateway and in turn call the Lambda Function which will send us the email through SES.
Firstly, let’s create the index.html file:
[index.html]
<html>
<body>
  <form id="LambdaAPITestForm">
    Email: <input type="text" name="email"  id="email"><br>
    Subject: <input type="text" name="subject" id="subject"><br>
    Message: <textarea rows="5" cols="20" name="message" id="message"></textarea><br>
    <input type="submit" id="submit" name="submit" value="Submit" >
  </form>
  <script type="text/javascript">
    document.getElementById('LambdaAPITestForm').addEventListener('submit', LambdaAPITestFormSubmit);
    function LambdaAPITestFormSubmit(event) {
      event.preventDefault();
      var email = document.getElementById("email").value;
      var subject = document.getElementById("subject").value;
      var message = document.getElementById("message").value;

      var body = {
        email: email,
        subject: subject,
        message: message
      }
      fetch("https://$API-ID.execute-api.us-east-1.amazonaws.com/prod/LambdaTestAPI",
      {
          method: "POST",
          body: JSON.stringify(body)
      });
    }
  </script>
</body>
</html>
In the above HTML file, we performed the following:
- Create the HTML Form object with the parameters for our email message to be sent
- Created a listener to access the form data and submit the form to the Lambda API
- Converted our form data to JSON
- Created the send request to the Lambda API
Now, let’s create the bucket to store our HTML file and access it over the internet using AWS CLI “aws s3” commands:
$ aws s3 mb s3://lambdaapitest
$ aws s3 website s3://lambdaapitest/ --index-document index.html --error-document error.html
$ aws s3 cp index.html s3://lambdaapitest
upload: ./index.html to s3://lambdaapitest/index.html
Above, we:
- Created the bucket using “aws s3 mb” named “lambdaapitest“
- Configured the bucket to be a website bucket with an index file of index.html using “aws s3 website” command
- Uploaded our index.html file to the bucket “lambdaapitest” using “aws s3 cp” command
Next, we will need to define a bucket policy to allow unauthenticated users to view the website. We do this by specifying a bucket policy and modifying our bucket with the policy:
[bucket-policy.json]
{
  "Version":"2012-10-17",
  "Statement":[{
	"Sid":"PublicReadGetObject",
        "Effect":"Allow",
	  "Principal": "*",
      "Action":["s3:GetObject"],
      "Resource":["arn:aws:s3:::lambdaapitest/*"
      ]
    }
  ]
}

$ aws s3api put-bucket-policy --bucket lambdaapitest --policy file://bucket-policy.json
We should be able to access the website using AWS hosted website address:
- bucket-name.s3-website–region.amazonaws.com, or
- bucket-name.s3-website.region.amazonaws.com
My AWS region is ap-southeast-2 so the URL is http://lambdaapitest.s3-website-ap-southeast-2.amazonaws.com.
When we are done testing, we can remove the bucket by deleting the index.html file and then removing the bucket using the following aws s3 commands:
aws s3 rm s3://lambdaapitest/index.html
aws s3 rb s3://lambdaapitest
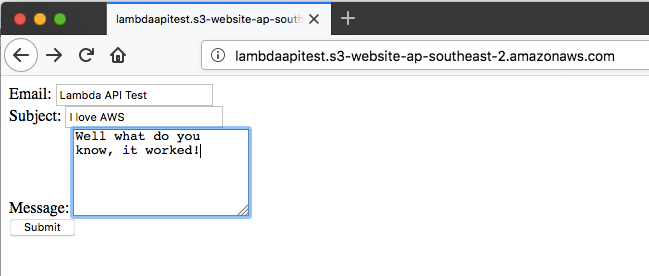
Performing the Test
Now it’s the moment of truth! Open a browser and access the HTML page. Your browser should look something like this:
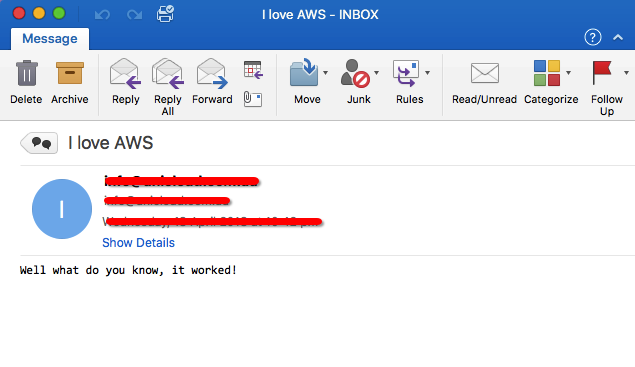
And checking our email…..