This article aims to unlock the power of Azure Cloud Shell, a powerful and easy to use command line interface to spin up and manage your Azure workloads.
In this post we will deploy a simple Centos 7.x (latest) Azure VM that will be used as a web server. It is designed to be simple and easy to demonstrate how powerful it is levarging Azure Cloud Shell to spin up workloads fast. Use your imagination as to how these simple steps can ease your administration of Azure resources and to automate daily tasks.
Firstly, you will need to be logged in to Azure Console. When logged in you will see your default dashboard with a handy utility which will allow you to connect to a shell which we will use to execute a set of Azure CLI commands. Once logged in, click on the Cloud Shell icon in the top right hand corner (see screenshot below).

Once loaded, we can spin up either a Powershell or a Bash terminal. The dropdown box within the shell allows you to choose your desired terminal type. We will use Bash in this post.
Once the terminal is connected, it should mount your cloud drive which will allow you to store files and download tools to leverage when running CLI commands.
All Azure CLI commands are run by executing “az“. The “az” command supports a set of base commands which allow you to work with Azure resources.
The first command we want to run is to list the regions supported in our account.
$ az account list-locations --output table
DisplayName            Latitude    Longitude  Name
-------------------  ----------  -----------  ------------------
East Asia               22.267      114.188   eastasia
Southeast Asia           1.283      103.833   southeastasia
Central US              41.5908     -93.6208  centralus
East US                 37.3719     -79.8164  eastus
East US 2               36.6681     -78.3889  eastus2
West US                 37.783     -122.417   westus
North Central US        41.8819     -87.6278  northcentralus
South Central US        29.4167     -98.5     southcentralus
North Europe            53.3478      -6.2597  northeurope
West Europe             52.3667       4.9     westeurope
Japan West              34.6939     135.502   japanwest
Japan East              35.68       139.77    japaneast
Brazil South           -23.55       -46.633   brazilsouth
Australia East         -33.86       151.209   australiaeast
Australia Southeast    -37.8136     144.963   australiasoutheast
South India             12.9822      80.1636  southindia
Central India           18.5822      73.9197  centralindia
West India              19.088       72.868   westindia
Canada Central          43.653      -79.383   canadacentral
Canada East             46.817      -71.217   canadaeast
UK South                50.941       -0.799   uksouth
UK West                 53.427       -3.084   ukwest
West Central US         40.89      -110.234   westcentralus
West US 2               47.233     -119.852   westus2
Korea Central           37.5665     126.978   koreacentral
Korea South             35.1796     129.076   koreasouth
France Central          46.3772       2.373   francecentral
France South            43.8345       2.1972  francesouth
You will need to choose the location for which you will want to run your commands against. We will use “australiaeast” in this post.
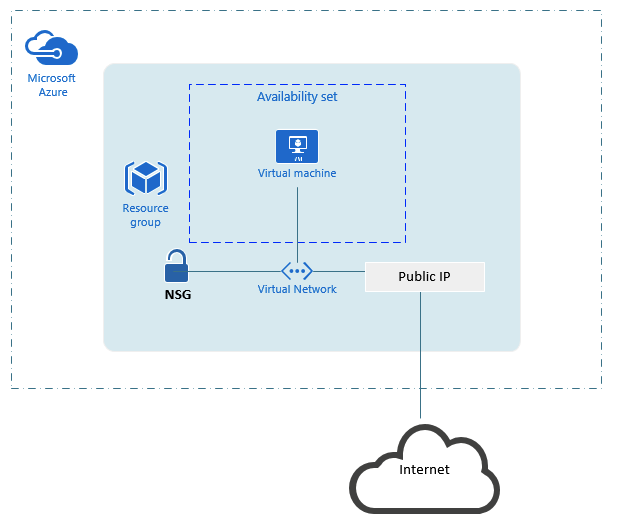
In a nutshell, Azure VM workloads will require the following components to be instantiated (specifically for this post anyway):
- Resource Groups – A resource group is basically a number of resources for which share the same lifecycle.
- VNet – Virtual Networks for which we will connect our resources to. A VNet will also have a subnet and will be instantiated within a Azure location
- Public IP – These are the public IP endpoints to connect our workloads onto the Internet
- NSG – Network Security Group for which we will use to control access to our resources. For example the ports we allow to be accessible on the Internet will be defined here via rules that we define
- NIC – These are the network interfaces we will use to connect our VM to. A NIC will be associated with a VNet, have a set of rules (via the NSG) associated to it as well as allow us to associate it with a Public IP
- Availability Set – Here we allow our VM’s to be more highly available and reliable by placing them on isolated nodes increasing our fault domain which are clustered in the back end
- VM Images – These are preconfigured VM Images which we can use to deploy our workloads, for example Windows Server 2016 or Centos
- VM – The virtual machines for which we will deploy. The VM’s are part of an availability set within a resource group that have associated NIC’s connected to VNet and have associated rules (via NSG) applied to them that make up our workloads
The above is a simple explanation of how Azure Resource Groups work for VM’s and their related components. Below diagram illustrates the overall framework and how these components fit together.
Now for the fun stuff!
First up, let’s use our Cloud Shell to create a Resource Group for our web server using the “az group” base command. We will create an Resource Group called rg-auseast-web1 within the location Australia East.
$ az group create --name rg-austeast-web1 --location australiaeast
The Resource Group is going to need a VNet, lets use the “az network” base command to create a vnet object:
$ az network vnet create \
    --resource-group rg-austeast-web1 \
    --name vnet-web1 \
    --address-prefix 192.168.0.0/16 \
    --subnet-name subnet-web1 \
    --subnet-prefix 192.168.1.0/24
Above we created the network with a prefix of 192.168.1.0/16 and a new subnet 192.168.1.0/24 (our VM will end up getting a LAN address within this subnet). We named the vnet – vnet-web1.
As we are going to deploy a publicly accessible web server, we will need a Public IP Address. Let’s create one:
$ az network public-ip create \
    --resource-group rg-austeast-web1 \
    --name ip-web1 \
    --dns-name my-dns-name
The Public IP we just created is named ip-web1 within our Resource Group. An important attribute is the dns-name which will end up being a publicly resolvable FQDN we can connect to. The above will allow us to connect to this Public IP Address using:
my-dns-name.australiaeast.cloudapp.azure.com
Next we will need to create our NSG, we will use the name nsg-web1 and create it in our Resource Group using “az network nsg create” command:
$ az network nsg create \
    --resource-group rg-austeast-web1 \
    --name nsg-web1
An NSG without any rules is pretty useless. We will be opening port TCP/80 for browsing to our web server and TCP/22 to connect via SSH to our VM. Let’s use “az network nsg rule” command and add the rules:
$ az network nsg rule create \
    --resource-group rg-austeast-web1 \
    --nsg-name nsg-web1 \
    --name nsg-web1-ssh \
    --protocol tcp \
    --priority 1000 \
    --destination-port-range 22 \
    --access allow

$az network nsg rule create \
    --resource-group rg-austeast-web1 \
    --nsg-name nsg-web1 \
    --name nsg-web1-http \
    --protocol tcp \
    --priority 1001 \
    --destination-port-range 80\
    --access allow
As you can see, we created 2 rules specifying the Resource Group, NSG, a name for the rule, protocol, destination port range and the access to “allow“.
To see these rules created and other useful information about our NSG, we can use the “az network nsg show” command:
$ az network nsg show --resource-group rg-austeast-web1 --name nsg-web1
Our VM will require a NIC to connect to. This NIC will be associated with an NSG, VNet (along with the subnet required) and Public IP address. We will use the “az network nic” base command:
$ az network nic create \
    --resource-group rg-austeast-web1 \
    --name rg-austeast-web1-nic1 \
    --vnet-name vnet-web1 \
    --subnet subnet-web1 \
    --public-ip-address ip-web1 \
    --network-security-group nsg-web1
The above will create the network interface with the name rg-austeast-web1-nic1 which we will connect to our VM within our Resource Group.
Before we create our VM, we will create it within an Availability Set. Let’s create our Availability Set using the “az vm availability-set” base command:
$ az vm availability-set create \
    --resource-group rg-austeast-web1 \
    --name as-web1
Our VM is going to be based on an image, in particular we have chosen Centos for this post. You can get a list of availabile images using “as vm image list” base command for the location desired:
$ az vm image list --offer Centos --location australiasoutheast --all --output table
We are ready to instantiate our VM. The “az vm create” base command will allow us to do this:
$ az vm create \
    --resource-group rg-austeast-web1 \
    --name azure-web1 \
    --location australiaeast \
    --availability-set as-web1 \
    --nics rg-austeast-web1-nic1  \
    --size Standard_D2s_v3 \
    --image Centos \
    --admin-username username \
    --ssh-key-value "$(cat ~/.ssh/my-key.pub)"
The above will create our VM based on the attributes we defined as follows:
- –resource-group is our Resource Group created earlier
- –name is the name for our VM
- –location is the location we desired
- –availability-set we created earlier
- –nics is the NIC we created earlier
- –size is the VM Size with Standard_D2S_v3 as the default for this VM image. You can choose the size you wish to use and is dependent on what your account will allow
- –image is because we are using a Centos based image
- –admin-username is the username we will use to connect to our VM when connecting via SSH
- –ssh-key-value is the Public Key from our key pair. You will need to create a key pair using a tool such as ssh-keygen. There are different options for SSH as you can use pre-defined keypairs you have already uploaded prior to your Azure account. You will obviously need your Private Key to connect
Once the VM is up and running, we can connect to it using either the Public IP address or better yet, the DNS name we defined earlier for our Public IP we created. For example we can use:
$ ssh -i ~/.ssh/my-key username@my-dns-name.australiaeast.cloudapp.azure.com
And there you have it, we have deployed our VM within our Resource Group associated to a VNet with some rules to allow us to access it. You would obviously need to install your web server software however once done you will be able to browse to it using:
http://my-dns-name.australiaeast.cloudapp.azure.com
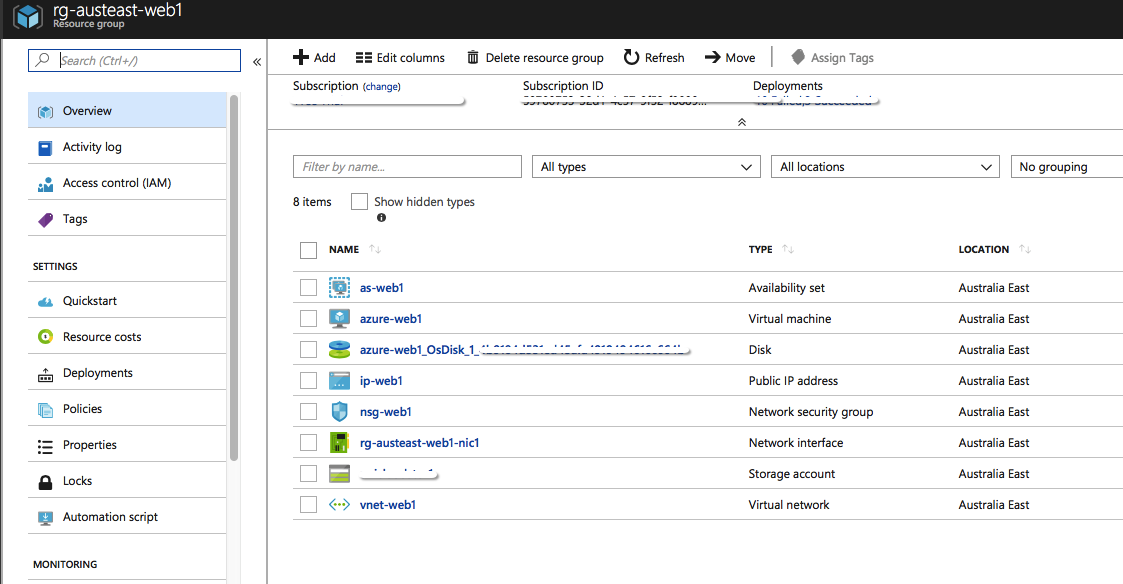
If you want to have a look at the Resource Group created and the resources associated to it, we can now do so in the Azure Dashboard. It should look something like the below.