This article is an extension to our previous primer on using Azure Cloud Shell – Azure CLI Primer – Azure Cloud Shell
This article aims to unlock the power of Ansible within Azure Cloud Shell.
In the previous article we deployed a Centos 7.x VM using Azure CLI. This time we will create an Ansible playbook to do exactly the same set of tasks to demonstrate how quickly and easily we can deploy workloads using Ansible.
We will demonstrate how we will build our yaml file which we will use to create the resource groups and the associated network/VM components. We will show that for every shell command we ran, the yaml syntax equivalent. Once done we will place all the Ansible sections into a single file and save it as a playbook which we will run.
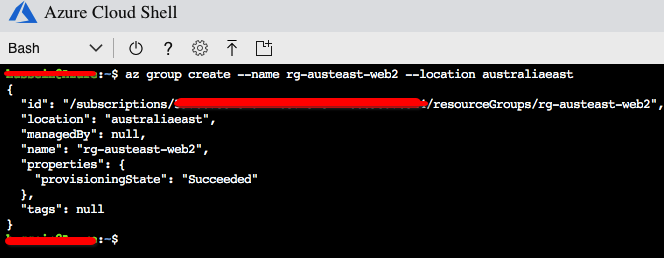
This playbook assumes we have created a resource group for our VM/Networks (shown later on and details available in the previous post). The resource group name is rg-austeast-web2.
  - name: Create VNET
    azure_rm_virtualnetwork:
      resource_group: rg-austeast-web2
      name: vnet-web2
      address_prefixes: "192.168.0.0/16"
  - name: Create subnet
    azure_rm_subnet:
      resource_group: rg-austeast-web2
      name: subnet-web2
      address_prefix: "192.168.1.0/24"
      virtual_network: vnet-web2
Above we defined our VNET “vnet-web2” with address prefix 192.168.0.0/16 with subnet “subnet-web2” with prefix 192.168.1.0/24.
The following section we define the the Public IP address to be created “ip-web2“.
  - name: Create Public IP
    azure_rm_publicipaddress:
      resource_group: rg-austeast-web2
      allocation_method: Static
      name: ip-web2
Now we will define the NSG and associated rules. With CLI, we first created the NSG first then added the associated rules. Here we will define them in a single section block.
  - name: Create NSG with rules
    azure_rm_securitygroup:
      resource_group: rg-austeast-web2
      name: nsg-web2
      rules:
      - name: nsg-web2-ssh
        protocol: Tcp
        destination_port_range: 22
        access: Allow
        priority: 1000
        direction: Inbound
      - name: nsg-web2-http
        protocol: Tcp
        destination_port_range: 80
        access: Allow
        priority: 1001
        direction: Inbound
Above we created our NSG “nsg-web2” and specified 2 rules for SSH and HTTP. Next, we define the NIC to attach to our VM.
  - name: Create NIC
    azure_rm_networkinterface:
      resource_group: rg-austeast-web2
      name: rg-austeast-web2-nic1
      virtual_network: vnet-web2
      subnet: subnet-web2
      public_ip_name: ip-web2
      security_group: nsg-web2
Above we defined the resource group, NIC name, VNET it belongs to, subnet it belongs to, the Public IP address (name) to be applied and NSG to allow the required access to the VM.
Now we are ready to define our VM:
 - name: Create VM
    azure_rm_virtualmachine:
      resource_group: rg-austeast-web2
      name: azure-web2
      vm_size: Standard_D2s_v3
      admin_username: username
      ssh_password_enabled: false
      ssh_public_keys:
         - path: /home/username/.ssh/authorized_keys
           key_data: "ssh-rsa ENTER KEY DATA HERE"
      network_interfaces: rg-austeast-web2-nic1
      image:
        offer: CentOS
        publisher: OpenLogic
        sku: '7.4'
        version: latest
Above we defined:
- VM named “azure-web2”
- Admin user name (you will need to define your own)
- Public key – you will need to replace the key data noted above with ENTER KEY DATA HERE
- NIC “rg-austeast-web2-nic1”
- The Centos image to use
Now that we know how our yaml file will be made up, let’s login into Azure Cloud Shell and create the playbook.
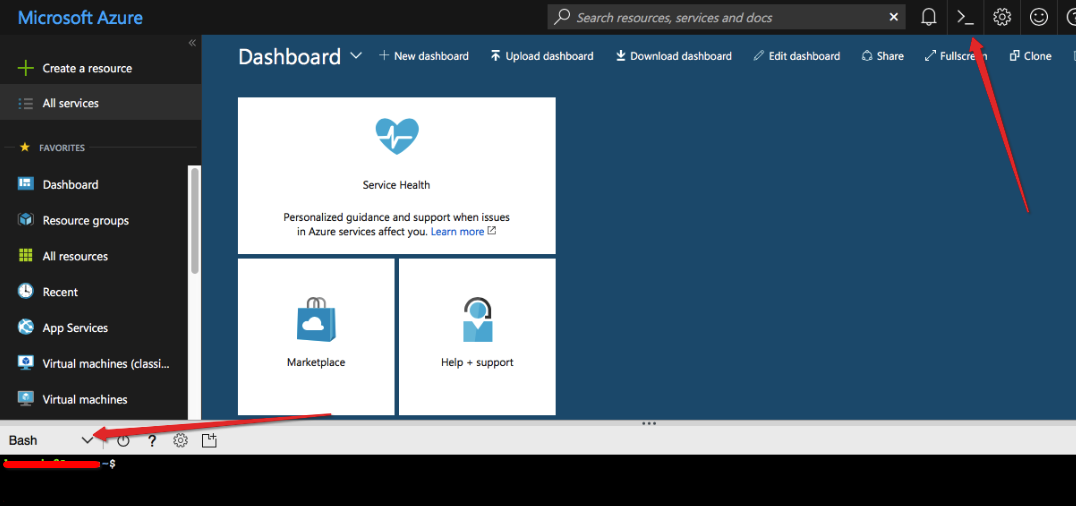
Firstly, launch Azure Cloud Shell icon in the top right hand corner (see screenshot below).
Let’s create the YAML file “azure-vm.yml” with VI text editor:
$ vi azure-vm.yml
Press “i” to insert, copy and paste the following yaml content into the editor:
- name: Create Azure VM
  hosts: localhost
  connection: local
  tasks:
  - name: Create VNET
    azure_rm_virtualnetwork:
      resource_group: rg-austeast-web2
      name: vnet-web2
      address_prefixes: "192.168.0.0/16"
  - name: Create subnet
    azure_rm_subnet:
      resource_group: rg-austeast-web2
      name: subnet-web2
      address_prefix: "192.168.1.0/24"
      virtual_network: vnet-web2
  - name: Create Public IP
    azure_rm_publicipaddress:
      resource_group: rg-austeast-web2
      allocation_method: Static
      name: ip-web2
  - name: Create NSG with rules
    azure_rm_securitygroup:
      resource_group: rg-austeast-web2
      name: nsg-web2
      rules:
      - name: nsg-web2-ssh
        protocol: Tcp
        destination_port_range: 22
        access: Allow
        priority: 1000
        direction: Inbound
      - name: nsg-web2-http
        protocol: Tcp
        destination_port_range: 80
        access: Allow
        priority: 1001
        direction: Inbound
  - name: Create NIC
    azure_rm_networkinterface:
      resource_group: rg-austeast-web2
      name: rg-austeast-web2-nic1
      virtual_network: vnet-web2
      subnet: subnet-web2
      public_ip_name: ip-web2
      security_group: nsg-web2
  - name: Create VM
    azure_rm_virtualmachine:
      resource_group: rg-austeast-web2
      name: azure-web2
      vm_size: Standard_D2s_v3
      admin_username: username
      ssh_password_enabled: false
      ssh_public_keys:
         - path: /home/username/.ssh/authorized_keys
           key_data: "ssh-rsa ENTER KEY DATA HERE"
      network_interfaces: rg-austeast-web2-nic1
      image:
        offer: CentOS
        publisher: OpenLogic
        sku: '7.4'
        version: latest
Now press “ESC” character and type in “:wq!” (without quotes) to save the content.
We will need our resource group prior to running the Ansible playbook. Let’s create the resource group.
Now we can run the playbook using “ansible-playbook” command within Azure Cloud Shell:
$ ansible-playbook azure-vm.yml
The playbook will run with the associated tasks and look something like this:
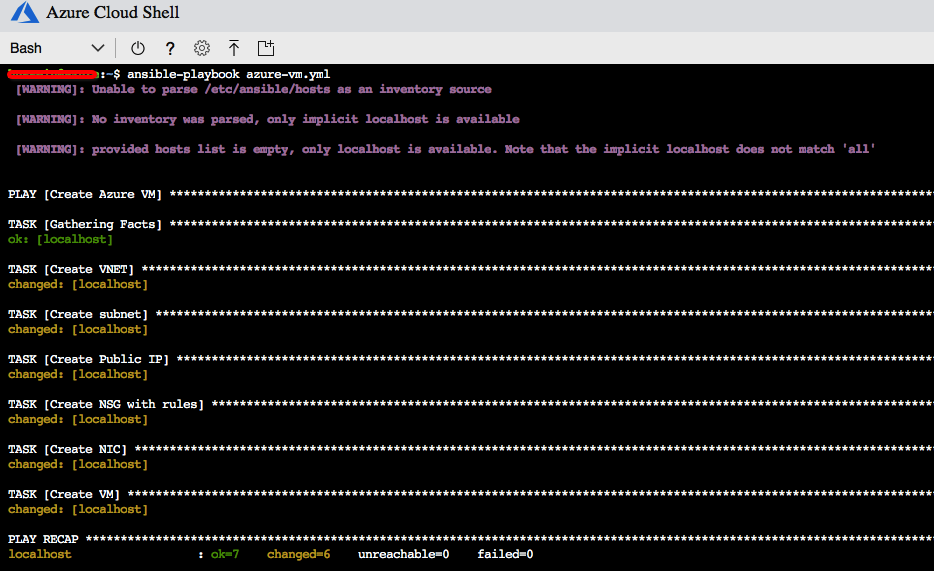
And there you go…
This is just a demo so I will go ahead and remove the resource group using “az group –delete” command.
