Out of the box, OpenShift will give you a production ready solution for deploying containers at scale and tooling to easily integrate your CI/CD pipelines.
This article aims to demonstrate a quick to deploy OpenShift solution based on its open source variant – Origin. It will be spun up on Azure as it integrates well and provides you with the flexibility to customise the deployment at ease. End to end, it should take you just over 30 minutes to be up and running with an OpenShift console ready to use.
This article assumes you have an Azure subscription and have access to Azure Cloud Shell (CLI). For further instructions on how to use CLI, visit here.
First, let’s create our resource group. We will use location ‘australiaeast’ however you can choose any location you wish.
1) Go to shell.azure.com and login. Run the following commands (assuming only a single subscription is used and you’re all logged in):
SUBSCRIPTION_ID=$(az account list --query "[0].id" | tr -d '"')
RESOURCE_GROUP='OpenShiftRG'
LOCATION='australiaeast'
az group create --name $RESOURCE_GROUP --location $LOCATION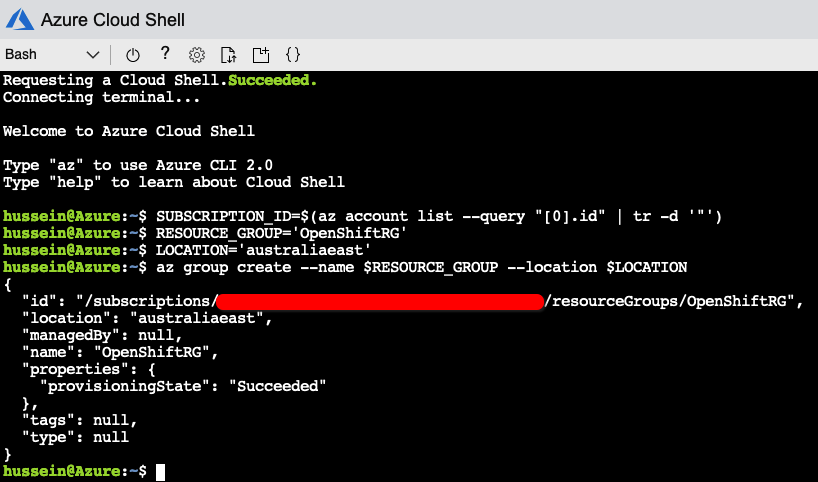
2) Next, we create an account service principal using the resource group scope. We will usea simple password of Pass@word1
SCOPE=$(az group list --query "[?name == '$RESOURCE_GROUP'].id"  --output tsv | tr -d '"')
az ad sp create-for-rbac -n openshiftcloudprovider --password Pass@word1 --role contributor --scopes $SCOPE
You should get the following output (I have hidden ID’s):
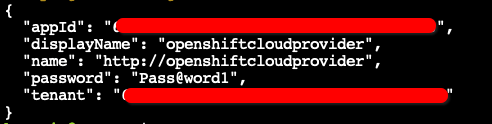
The appId above will be used for the aadClientId attribute within deployment, we can put it into a variable as follows:
aadClientId=$(az ad sp list --all --query "[?displayName == 'openshiftcloudprovider'].appId" --output tsv | tr -d '"')3) Lets create the Azure Key Vault and store the private key which we will use for our deployment. I am just using some simple values and created a local key pair however you can create what is suitable for your deployment (run “ssh-keygen -t rsa” if you haven’t done so already).
KeyVaultName='openshiftkeyvault1'
SecretName='sshkeypair1'

az keyvault create -n $KeyVaultName -g $RESOURCE_GROUP -l $LOCATION --enabled-for-template-deployment true
az keyvault secret set --vault-name $KeyVaultName -n $SecretName --file ~/.ssh/id_rsa
PUBLIC_KEY=$(cat ~/.ssh/id_rsa.pub)
PUBLIC_KEY_REGEX="$(echo $PUBLIC_KEY | sed -e 's/\\/\\\\/g; s/\//\\\//g; s/&/\\\&/g')"
4) Microsoft has a well documented set of templates we can re-use and customise for our deployment on GitHub. Clone the GitHub expository for open shift-origin into our workspace:
git clone https://github.com/Microsoft/openshift-origin.git
cd openshift-origin
5) It is time to customise our deployment based on the values we have established. The git repository contains a sample file we can use as a base which we will need to customise for our deployment. Whilst many of the settings in here can be changed to suit your needs, we will just go with some basics. Go into the openshift-orgin directory and create an new azuredeploy.parameters.local.json file with the following content:
{
        "$schema": "http://schema.management.azure.com/schemas/2015-01-01/deploymentParameters.json#",
        "contentVersion": "1.0.0.0",
        "parameters": {
                "_artifactsLocation": {
                        "value": "https://raw.githubusercontent.com/Microsoft/openshift-origin/master"
                },
                "masterVmSize": {
                        "value": "Standard_D8s_v3"
                },
                "infraVmSize": {
                        "value": "Standard_D4s_v3"
                },
                "nodeVmSize": {
                        "value": "Standard_D4s_v3"
                },
                "storageKind": {
                        "value": "managed"
                },
                "openshiftClusterPrefix": {
                        "value": "osdemo1"
                },
                "masterInstanceCount": {
                        "value": 1
                },
                "infraInstanceCount": {
                        "value": 1
                },
                "nodeInstanceCount": {
                        "value": 1
                },
                "dataDiskSize": {
                        "value": 128
                },
                "adminUsername": {
                        "value": "azureuser"
                },
                "openshiftPassword": {
                        "value": "Pass@word1"
                },
                "enableMetrics": {
                        "value": "true"
                },
                "enableLogging": {
                        "value": "false"
                },
                "sshPublicKey": {
                        "value": "$PUBLIC_KEY_REGEX"
                },
                "keyVaultResourceGroup": {
                        "value": "$RESOURCE_GROUP"
                },
                "keyVaultName": {
                        "value": "$KeyVaultName"
                },
                "keyVaultSecret": {
                        "value": "$SecretName"
                },
                "enableAzure": {
                        "value": "true"
                },
                "aadClientId": {
                        "value": "$aadClientId"
                },
                "aadClientSecret": {
                        "value": "Pass@word1"
                },
                "defaultSubDomainType": {
                        "value": "nipio"
                },
                "defaultSubDomain": {
                        "value": "openshift-origin.mydomain.com"
                }
        }
}
We will adjust the above based on our deployment using sed:
sed -i 's/"$PUBLIC_KEY_REGEX"/"'"$PUBLIC_KEY_REGEX"'"/' azuredeploy.parameters.local.json
sed -i 's/"$RESOURCE_GROUP"/"'"$RESOURCE_GROUP"'"/' azuredeploy.parameters.local.json
sed -i 's/"$KeyVaultName"/"'"$KeyVaultName"'"/' azuredeploy.parameters.local.json
sed -i 's/"$SecretName"/"'"$SecretName"'"/' azuredeploy.parameters.local.json
sed -i 's/"$aadClientId"/"'"$aadClientId"'"/' azuredeploy.parameters.local.json
You will have realised I used single instances for the master/infra/node count, this is because I am simply doing a demo. You would need to accomodate it to your own deployment preferences, however for a POC this is fine. Also make sure you choose the correct sizes based on your quotas, the Infra/Node VM’s will need a minimum of 4vCPU instances and 8vCPU for Master.
6) Our deployment should now be ready to go. Run the following command to deploy the template:
az group deployment create --resource-group $RESOURCE_GROUP --template-file azuredeploy.json --parameters @azuredeploy.parameters.local.json --no-waitYou can go into Azure Portal and see the deployment progress:
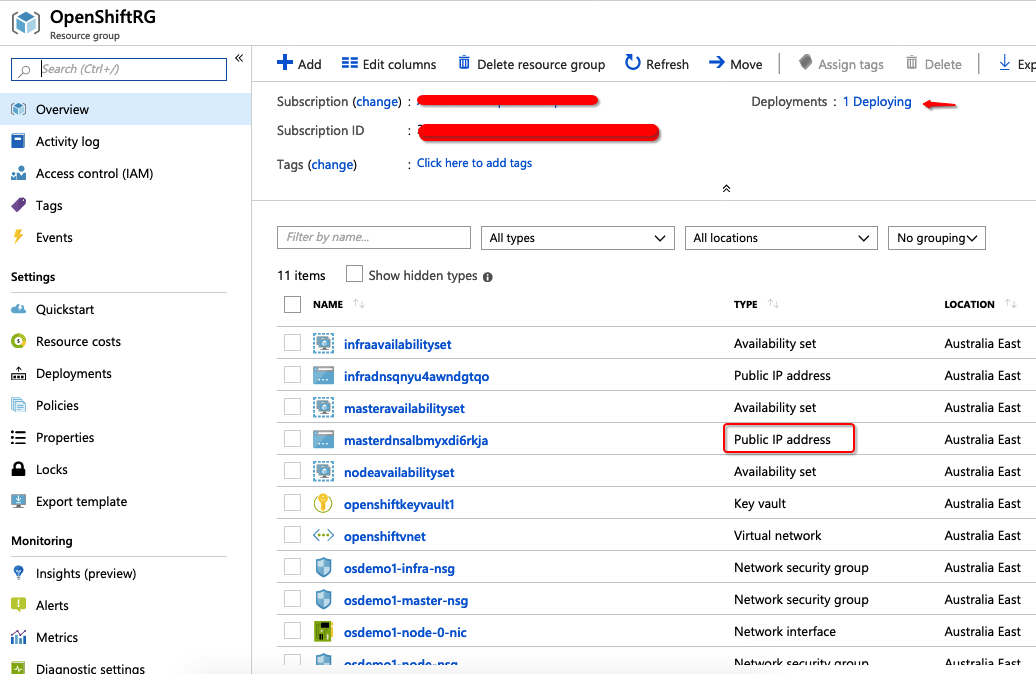
As per above, you can see that the deployment is creating the open shift infrastructure services including the virtual networks/load balancer which we will use to connect to the console. Wait for it to complete by clicking on the deployments blade. When it is complete, you should see the following output:
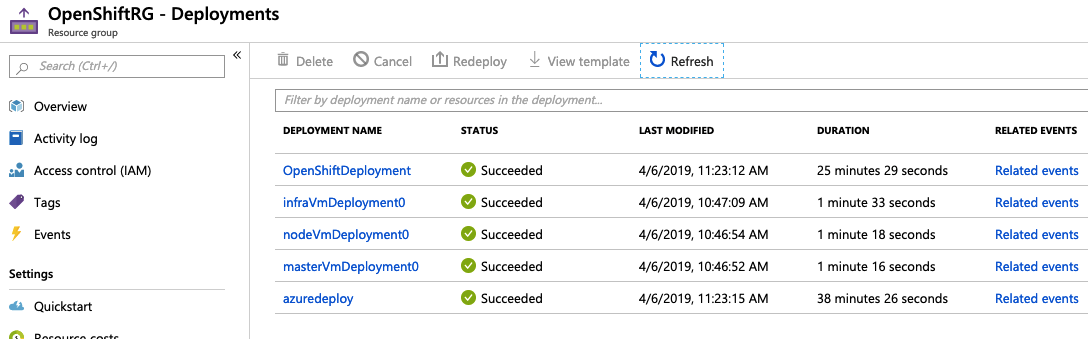
You can see the deployment process took just over 38 minutes to complete.
Now that our OpenShift environment is up and running, we can connect to it. Run the following command in the shell to get your public IP address/DNS name:
az network public-ip list --query "[?resourceGroup=='OpenShiftRG'].{name:name, address:ipAddress, group:resourceGroup, dns:dnsSettings.fqdn}" --output table
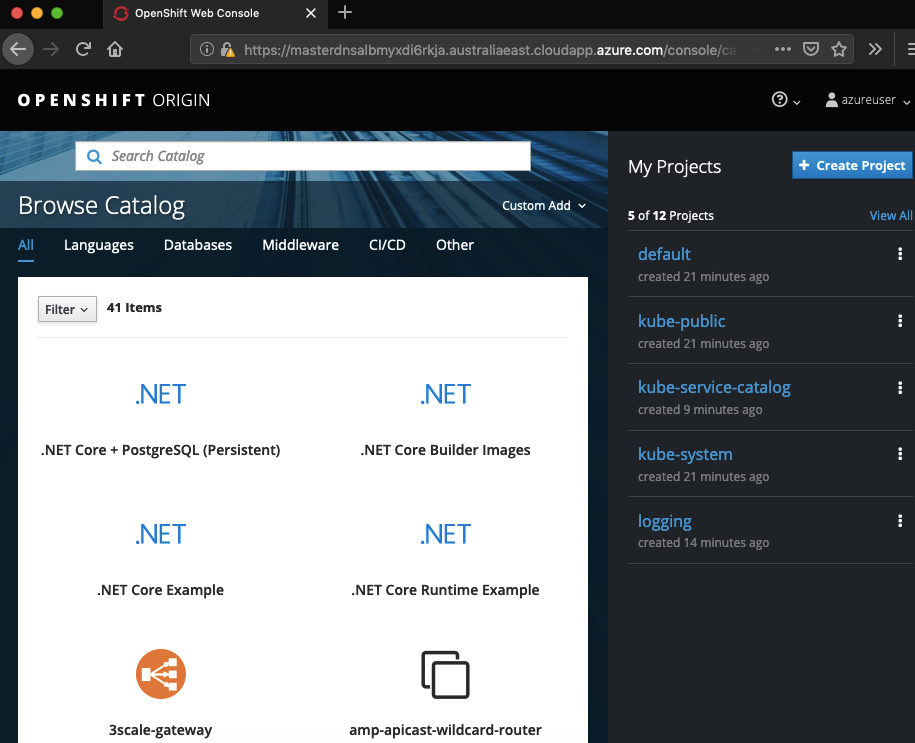
As per above, our DNS name for the master instance is “masterdnsalbmyxdi6rkja.australiaeast.cloudapp.azure.com” hence we can connect to it by going to:
https://masterdnsalbmyxdi6rkja.australiaeast.cloudapp.azure.com/console
You will get some SSL errors because we have used self-signed certificates, they can be ignored. Login with the azure user/Pass@word1 username and password combination that was set earlier, you will see the OpenShift console up and running:
You are now ready to deploy your containers with OpenShift. There are many different solution templates available for you to use out of the box or you can integrate your own docker build scripts. I won’t go over how to use OpenShift, will leave that for another day.
If you want to manage OpenShift using the CLI you can connect to the master node using SSH and NAT’d TCP port 2200 which the master load balancer creates as part of the deployment process. Let’s log in and run “oc get nodes” and see the status of each node in our cluster:

When you’re all done, delete the Resource Group:
az group delete -n OpenShiftRG -y --no-wait